

How to permanently disable Windows Defender Antivirus on Windows 10
Windows Defender Antivirus is the free malware solution that Microsoft includes on every installation of Windows 10. It's a security software package meant to provide the first line of defense to protect your device and data confronting malware, including viruses, ransomware, rootkits, spyware, and other types of malicious programs.
Although the antivirus runs automatically, and it can disable itself as you install a third-political party security software, the but caveat is that Windows 10 doesn't offer a mode to disable it permanently. Perhaps the obvious reason is that Microsoft doesn't want y'all to use your device without whatsoever protection, which is a good matter.
However, at that place are still some cases where some users may prefer non to employ Windows Defender Antivirus, such as on a kiosk device that isn't connected to a network and where peripheral connectivity isn't immune.
In this Windows 10 guide, we'll walk you through the steps to permanently disable the Windows Defender Antivirus on your computer using Group Policy, Registry, and Windows Defender Security Center.
- How to disable Windows Defender Antivirus using Group Policy
- How to disable Windows Defender Antivirus using Registry
- How to disable Windows Defender Antivirus using Security Heart
How to disable Windows Defender Antivirus using Group Policy
On Windows x Pro, it'southward possible to use the Group Policy Editor to disable the Windows Defender Antivirus permanently.
- Use theWindows central + R keyboard shortcut to open the Run command.
- Typegpedit.msc and clickOK to open the Local Group Policy Editor.
-
Browse the following path:
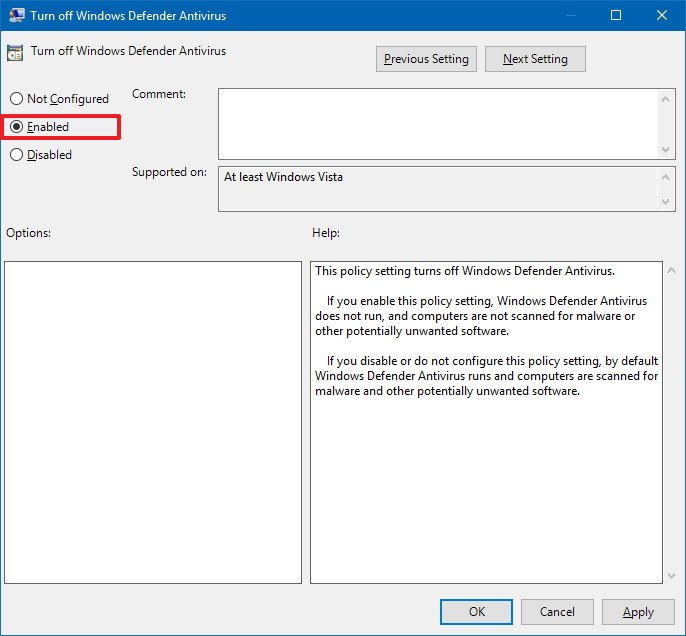
Reckoner Configuration > Administrative Templates > Windows Components > Windows Defender Antivirus - On the correct side, double-click the Turn off Windows Defender Antivirus policy.
- Select the Enabled option.
- Click Apply.
- Click OK.
-
Scan the following path:
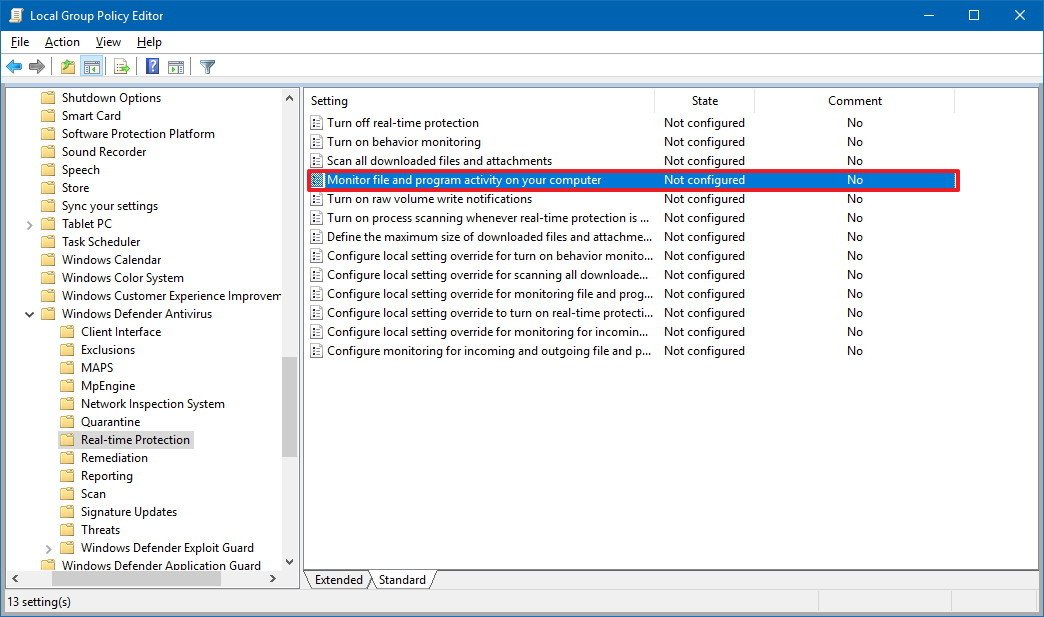
Reckoner Configuration > Authoritative Templates > Windows Components > Windows Defender Antivirus > Real-fourth dimension Protection -
On the right side, double-click the Plough on behavior monitoring policy.

- Select the Disabled option.
- Click Employ.
-
Click OK.
-
On "Real-fourth dimension Protection," double-click the Monitor file and program activity on your computer policy.
- Select the Disabled choice.
- Click Apply.
-
Click OK.

- On "Real-time Protection," double-click the Turn on process scanning whenever real-time protection is enabled policy.
- Select the Disabled pick.
- Click Use.
-
Click OK.

- On "Real-time Protection," double-click the Turn on behavior monitoring policy.
- Select the Disabled choice.
- Click Employ.
-
Click OK.

- Restart your computer.


Once you've completed the steps, Windows Defender Antivirus will no longer scan and detect malware on your device, even afterwards restarting your estimator.
At any fourth dimension, yous can enable the Windows Defender Antivirus using the aforementioned steps, but on step No. 5, 10, and 14, make sure to select the Not Configured pick. So but restart your device to use the changes.
How to disable Windows Defender Antivirus using Registry
The Local Group Policy Editor is not available on Windows 10 Home, just you can yet achieve the aforementioned results irresolute the Registry settings.
Alarm: This is a friendly reminder that editing the registry is risky, and it can cause irreversible damage to your installation if y'all don't practice information technology correctly. It'southward recommended to brand a total backup of your PC before proceeding.
- Apply theWindows key + R keyboard shortcut to open theRun command.
- Typeregedit, and clickOK to open up the Registry.
-
Scan the post-obit path:
HKEY_LOCAL_MACHINE\SOFTWARE\Policies\Microsoft\Windows Defender -
Right-click on the Windows Defender (folder) key, selectNew, and click onDWORD (32-bit) Value.

- Name the primal DisableAntiSpyware and printing Enter.
- Double-click the newly created key and set the value from 0 to 1.
-
Click OK.

- Right-click on the Windows Defender (folder) key, selectNew, and click onCentral.
-
Name the key Real-Time Protection and press Enter.

- Correct-click on the Real-Time Protection (folder) key, selectNew, and click onDWORD (32-fleck) Value.
- Name the key DisableBehaviorMonitoring and press Enter.
- Double-click the newly created key and gear up the value from 0 to 1.
-
Click OK.

- Right-click on the Real-Time Protection (folder) fundamental, selectNew, and click onDWORD (32-scrap) Value.
- Name the central DisableOnAccessProtection and press Enter.
- Double-click the newly created key and ready the value from 0 to 1.
-
Click OK.

- Right-click on the Real-Time Protection (folder) key, selectNew, and click onDWORD (32-bit) Value.
- Name the key DisableScanOnRealtimeEnable and printing Enter.
- Double-click the newly created key and set the value from 0 to ane.
-
Click OK.


Later completing the steps, but restart your computer to disable the Windows Defender Antivirus permanently.
If you change your mind, you can always revert the changes using the aforementioned instructions, but on step No. iii, correct-click the DisableAntiSpyware key, and select Delete. Then inside the Windows Defender (binder) key, right-click the Real-Fourth dimension Protection (folder) central and select Delete to remove key and its content. Finally, restart your device to complete reverting the changes.
How to disable Windows Defender Antivirus using Security Center
Alternatively, if you're installing a piece of software that requires deactivating the antivirus to install correctly, or you simply desire to disable the Windows 10 built-in antivirus temporarily, you can use the post-obit steps:
- Open up Windows Defender Security Center.
- Click on Virus & threat protection.
-
Click the Virus & threat protection settings option.

-
Turn off the Existent-time protection toggle switch.


After completing the steps, Windows Defender Antivirus will be disabled making it unable to monitor and stop malware from taking over your device. However, this is a temporary solution, somewhen, the antivirus will re-activate automatically after you lot restart your device.
Wrapping things upwards
While in that location could be scenarios where you may need to disable the antivirus, information technology's never recommended to have your device without malware protection.
If you're trying to go rid of Windows Defender Antivirus considering you lot prefer another security software, you should know that the built-in antivirus will disable itself automatically during the installation of third-party security software.
Information technology'south should as well be noted that the shield icon will proceed to appear in the notification area of the Taskbar because information technology'southward the Windows Defender Security Middle icon, non simply dedicated to the antivirus.
In the case you lot don't like the default anti-malware solution, here are a few alternatives that won't cost you a penny for basic protection.
- Bitdefender
- Kaspersky
- Avira
- AVG
More Windows 10 resources
For more helpful manufactures, coverage, and answers to mutual questions well-nigh Windows ten, visit the following resource:
- Windows x on Windows Central – All you need to know
- Windows ten help, tips, and tricks
- Windows 10 forums on Windows Central
We may earn a committee for purchases using our links. Acquire more.

Source: https://www.windowscentral.com/how-permanently-disable-windows-defender-antivirus-windows-10
Posted by: worrellhavoing69.blogspot.com
0 Response to "How to permanently disable Windows Defender Antivirus on Windows 10"
Post a Comment